Contents
Introduction
What This Service Is All About
Pseudonymization adds an important layer of protection for personal data. According to the European GDPR §4 (5), "pseudonymisation" means the processing of personal data in such a manner that the personal data can no longer be attributed to a specific data subject without the use of additional information, provided that such additional information is kept separately and is subject to technical and organisational measures to ensure that the personal data are not attributed to an identified or identifiable natural person.
iPSN - an acronym for "Interactive PSeudonymizatioN" - is a tool for the generation and management of pseudonyms. iPSN generates pseudonyms for original values (either person data, such as name and date of birth, or generic string data, such as IDs from patient management systems) and stores these mappings in a database. The mapping table can be searched for original values as well as for pseudonyms. Anonymization (i.e. deletion of the original value) and commenting on mappings are also possible. The implementation of pseudonymization hierarchies (e.g. when biosamples are involved), the encrypted storage of personal data, a customizable access control, email notifications, and logging of user actions to create an accurate audit trail are other available features. In addition to the Web-UI, iPSN provides a RESTful API for the core functions pseudonymization (i.e. getting a pseudonym for given original data) and de-pseudonymization (i.e. retrieving original data for a given pseudonym) to allow the integration into other applications.
iPSN manages the mapping between identifying data and pseudonyms. Neither does iPSN scan through datasets or documents and automagically replace identifying data with the corresponding pseudonym nor does it determine what is identifying data and what is medical data. These tasks must be accomplished by other systems or processes.
Typical user groups of iPSN are medical data management teams, data trustees/custodians/stewards, but also investigators, e.g. in large multi-center registries.
Accessing Online Help
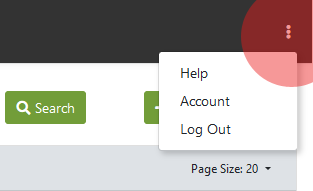
To access iPSN's user guide, click on the "Help" link on the bottom of each page (or, if you are logged in, in the upper right corner of each page). The user guide is displayed in its own browser window, so make sure that your browser's popup blockers are set to allow popups for the iPSN website. To close the help window, simply close the browser window.
To see information related to the topic you're reading about, click links in the help window just as you would in a regular web page (actually you are reading a regular web page). If you have a problem with using the iPSN which cannot be answered in these pages, please contact the iPSN system administration using the contact form.
Contact System Administration
If you have any questions, have noticed a bug or just have a comment for the iPSN system administrator, click on the "Contact" link on the bottom of each page. Enter your comments in the input form and click on "Send Message" when you are finished. If you expect a response, please enter your name and email address in the appropriate field.
Gaining Access
Logging In
When you point your browser at the iPSN website, you will normally see the application's login page. To use iPSN, you need an account. If you are visiting iPSN for the first time, contact the system administrator to create an account for you. As a legitimate user, enter your email address in the "Email Address" field and your password in the "Password" field. Then click the "Log In" button to sign in.
iPSN uses cookies and JavaScript. If you keep getting the login page even though you have an account and logged in, make sure your web browser has JavaScript enabled and is set to accept cookies.
If you've forgotten the password to your account, click on the "Forgot your password?" link directly under the password input field.
Password Recovery
If you don't remember your password, click on the "Forgot your password?" link on the login screen. This link leads to a form where you have to fill in the email address you are using to log in. After clicking the "Send Recovery Email" button, iPSN will send you an unencrypted email with a link to a page where you can set a new password.
Mail servers or email programs may incorrectly classify password recovery emails as spam or junk mail, so if you didn't receive the password recovery email, please check the spam filter or junk email folder in your email program to see if the email ended up there.
Logging Out
Always log out of iPSN when you have finished using it. Logging out ensures that no one else can use the same computer to view and change your information after you leave. You are automatically logged out of the system after 30 minutes of inactivity. You can also log out manually by clicking on "Log Out" in the upper right corner of the page.
Projects
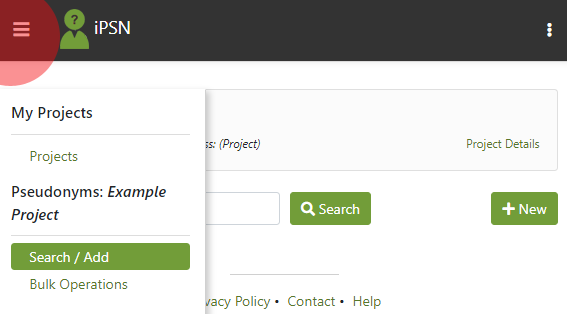
A project represents a dataset to be pseudonymized together with the settings for pseudonymization and project access. Pseudonyms generated by iPSN are always unique within a project. The list of projects for which your user account is authorized is shown after login. To work with a project, you must first select it by clicking on its name in the list of projects. After selecting a project, you will be redirected to a page which displays basic information about the project and allows you to search the project's dataset.
A menu with project-specific commands will appear on the left side of the page. Alternatively, on devices with small screens, a menu button will be shown in the top left corner of the page. Click or tap on this button to show or hide the menu.
Creating a Project
Projects can be created by users with the "Project Creation" special access right. If your account is granted this access right, you will see two buttons - "New" and "Import" - right above the list of projects. To create a project, click on the "New" button, enter the project settings in the form, and then click "Save".
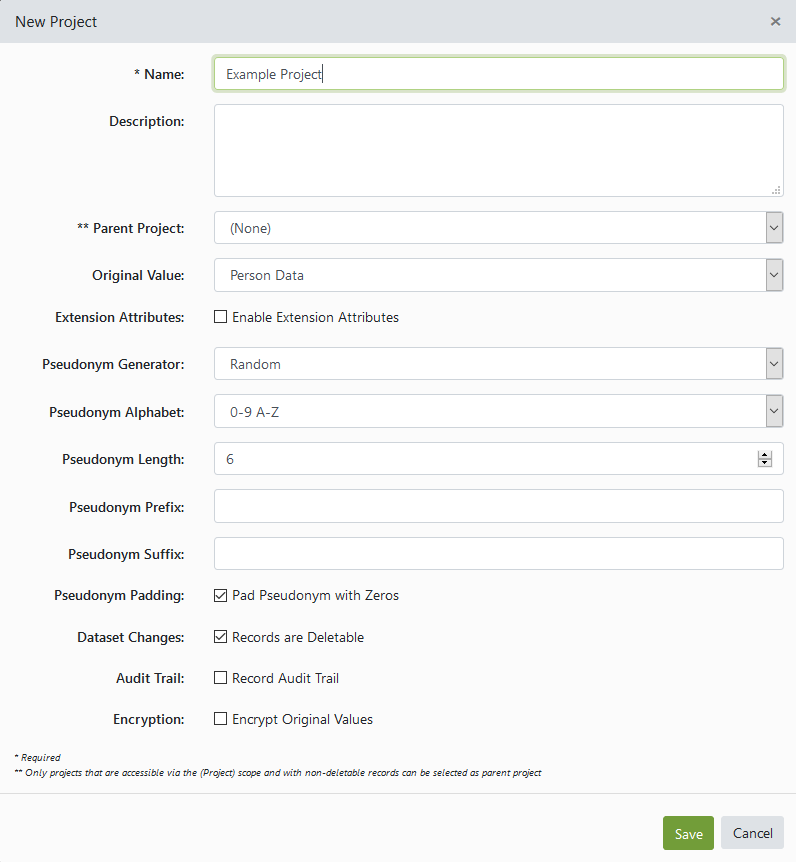
The following settings are available:
- Name: The project name. This field must be filled in; the name must be unique within all the projects currently in the database.
- Description: A description of the project.
- Parent Project: Select the parent project, if the new project is part of a project hierarchy. If a project has a parent, the original values are restricted to pseudonyms of the parent.
- Original Value: The type of data to be pseudonymized (the original value). Can be either
- Person Data: Original values are structured as last name, first name, middle name, date of birth, sex, and optional extension attributes.
- Generic String Data: A string value without any predefined structure.
- Extension Attributes: The names of extended person attributes, e.g., SSN, Lab-ID, etc. Extension attributes are only available with Person Data original values.
- Pseudonym Generator: Specifies how pseudonyms are to be generated. Can be
- Pseudonym Alphabet: Specifies the characters that the pseudonym may
contain. In addition to the various combinations of digits and letters, the following two special variants
can be selected:
- 0-9 A-Z Restricted: Contains the digits 0-9 and the letters A-Z without the letters B,I,O,S, and V (to avoid confusion with 8,1,0,5, and U). This alphabet is well suited if samples are to be labeled with the generated pseudonyms.
- 0-9 A-Z Separators: Contains the digits 0-9, the letters A-Z and the characters dot (.), minus (-), and underline (_). This alphabet is often used when pseudonyms are entered manually. If this alphabet is used with the sequential pseudonym generator, the separator characters are ignored, if it is used with the random pseudonym generator the generator makes sure that the pseudonym never starts and ends with a separator character.
- Pseudonym Length: The length of the pseudonym (number of characters).
- Pseudonym Prefix: An optional prefix added in front of the pseudonym.
- Pseudonym Suffix: An optional suffix that is appended to the pseudonym.
- Pseudonym Padding: If this option is selected, pseudonyms are filled up to the pseudonym length with zeros on the left side. Padding only occurs with manual and sequential pseudonym generators, since the random pseudonym generator always generates pseudonyms with the desired length.
- Dataset Changes: This setting determines whether records can be deleted from the project. Note that only projects whose records cannot be deleted can be selected as a parent project.
- Audit Trail: This setting determines whether user actions should be logged.
- Encryption: This setting is only available with Person Data original values and determines whether records are to be stored encrypted in the database. The key used for encryption is derived from the project password.
- Project Password: The password used for accessing the encrypted project.
Searching for Records
After a project has been created or selected in the project list, you will be redirected to a page which displays basic information about the project (click on the "Project Details" link to display various project attributes) and allows you to search the project's dataset.
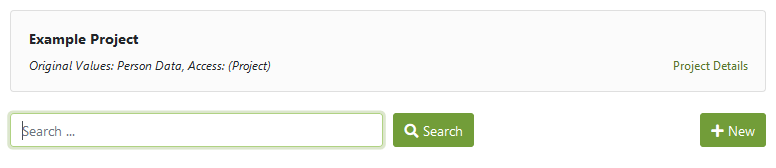
To search for the record with a given original value, enter the original value in the input field and click on the "Search" button (or press the "Enter" key). iPSN will display the list of matching records directly below the search form.
Generic String Data Searches
If the project uses Generic String Data as the original value type, the search term entered must match the
original value (with the exception of upper/lower case, which is ignored during the search). If you enter more
than one search term, e.g. ABC DEF, the terms are combined with OR, i.e. records containing
ABC or DEF are selected. If your search term contains blanks, enclose the term
in double-quotes.
Person Data Searches
If the project uses Person Data as the original value type, the search term entered must match the
last name, first name, or middle name phonetically, i.e. the record is selected if the last name,
the first name or the middle name sounds like the entered search term. If you search for
Meier, you will find the records containing Meier, Maier,
Mayer, etc.
Searches can be narrowed to a person data component by prefixing the search term with ln: (for
last name), fn: (for first name), mn: (for middle name), dob: (for
date of birth), and sex: (for sex). If you search for ln:meier you will find all
records where the person's last name sounds like Meier. Phonetic searches are only performed
in name components, for searches in dob: and sex: the search term must exactly
match the content of the person data component.
If you enter more than one search term in a narrowed person data search, e.g. ln:meier fn:robert,
the terms for one person data component are combined with OR but the search terms for different components are
combined with AND. For example, in ln:meier fn:robert the records where the last name sounds like
Meier and the first name sounds like Robert are selected. In
ln:meier ln:müller fn:robert the records where the last name sounds like Meier and
the first name sounds like Robert or last name sounds like Müller and the
first name sounds like Robert are selected.
The list of search results contains a column called Δ (Delta) that lists the distance between the record and the search term.
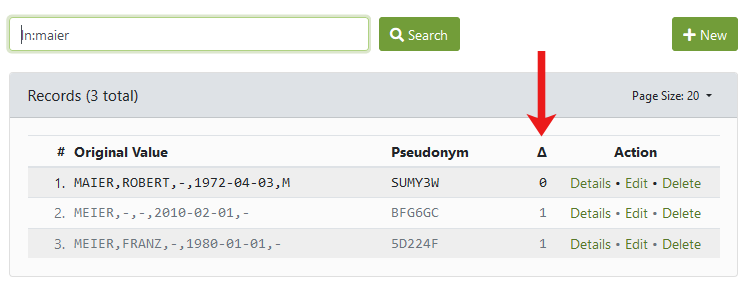
For example, in the search result shown above, the first record has a Δ of 0 since the record's last name
(MAIER) exactly matches the search term. The next two records have a Δ of 1 since the record's
last name differs in one letter (MAIER vs. MEIER). The list of search
results is always sorted by Δ in ascending order, i.e. the records with exact matches (Δ = 0) are
shown first.
Pseudonym Searches
To search for the record with a specific pseudonym, prefix the search term with psn:. For example,
searching for psn:X34BQ will select the record with the pseudonym X34BQ.
Record Details
To view full record details, click the "Details" link in the search result. Two more links - "Edit" and "Delete" - may also be available, their function is described below.
If the project is part of a project hierarchy, a "Trace Back to Root" link may be available in the record details. Clicking this link displays the mappings for this record and its parents in the project hierarchy.
Adding Records
To add a record to the project's dataset, go to the Search/Add-page and click on the "New" button next to the search field. Then enter the original value, the pseudonym (if pseudonyms are to be entered manually) and comments and finally click "Save" to add the record. A dialog with record details, including the generated pseudonym, is displayed next.
If the "New" button is missing, the project may be in read-only mode or you may not have the access right to add records.
If the project uses the Random or Sequential pseudonym generator, an option to force manual pseudonym entry is displayed. By selecting this option, the pseudonym generator will be bypassed for this record and the manually entered pseudonym will be assigned.
You will receive an error message if the project already contains a record with the entered data. Therefore, it is good practice to perform a search before adding a record.
Editing and Deleting Records
If a record has been entered in the project's dataset, the original value and pseudonym can no longer be changed. If errors occurred during data entry, the record must be deleted and re-entered (with forced manual pseudonym entry, if necessary). To delete a record, search for it and then click the "Delete" link in the search result.
However, a few changes, such as editing extension attributes (for records with "Person Data" original values), editing comments, changing the scope of the record, and anonymizing the record, can be performed without deleting the record. Search for the record and then click the "Edit" link in the search result.
The "Anonymization" option will overwrite the record's original data with a system-generated random value (for records with Person Data original values, additionally the date of birth is reset to 1900-01-01 as the date of birth is a required attribute). The pseudonym remains intact, the association with the original value is irretrievably lost. This is useful, for example, if the person withdraws her/his Informed Consent.
If the "Edit" or "Delete" links are missing, the project may be in read-only mode, or you may not have the access right to edit or delete records.
Bulk Operations
Searching for a record and adding it if it is not already in the project's dataset (Pseudonymization), as well as retrieving the original data for a specific pseudonym (Depseudonymization), are the main functions of iPSN. These two functions and a limited set of record updates (i.e., changing record extension attributes, comments and the record's scope) can also be performed on lists of records available as CSV files.
Choose "Bulk Operations" from the menu, then select the file containing the records. Select the file format and the desired operation, and click "Process". iPSN will process the uploaded file and return a CSV file with the dataset columns.
To download a template for the accepted data file click on "Create a Template for the Data File". Select the file format and the operation before clicking on this link.
If the file contains characters in the UTF-8 character set, select the "Data File in UTF-8" option. If the file starts with a BOM (Byte Order Mark), UTF-8 is selected automatically.
Downloading the Dataset
To download all pseudonymization records visible to the current user (the "dataset"), select the "Download Dataset" link in the menu, choose the file format and the columns to include in the download and then click the "Download" button.
Project Management Functions
The functions described below are available to users with "Manage Project" access right. The user who creates a project initially has full access rights, including the "Manage Project" right.
Changing Project Settings
By choosing "Project Settings" from the menu, all project settings except the encryption setting can be changed as long as the project does not contain any records. If the project contains records, the pseudonymization settings are locked, however, the name, the description, the access- and logging modes, and the project password for encrypted projects can still be changed.
An additional setting - Read-Only Access - is available. If you set the project to read-only access, all functions for changing the project's dataset are disabled.
Scopes and Users
iPSN allows multiple users to access a project. Select "Users" from the menu to manage the user accounts that have access to the project. A user account is identified by its email address and must exist before it can be assigned to a project. Contact the iPSN system administrator if you want to assign a user account that is not already in the database.
With the access rights - "Add Records [A]", "Edit Records [E]", "Download Records [L]", "Delete Records [D]" and "Manage Project [M]" - the functions available to the user can be controlled, while with the help of scopes the visibility of records can be restricted.
A scope represents a named subset of the project's dataset. User accounts are assigned to scopes and
subsequently all records that an account adds to the project's dataset are assigned to the scope of the
creating user. Furthermore, the search for records is restricted to the scope of an account, i.e. only
records that are in the same scope as the searching user are returned. If, for example, a project has the
two scopes GRAZ and VIENNA, the users assigned to scope GRAZ can only
access records assigned to GRAZ and users assigned to scope VIENNA only can access
records assigned to scope VIENNA. Each project has a scope called (Project) which
represents the entire project. Users assigned to the (Project) scope can access all records in
the project's dataset.
Scopes can be managed by selecting "Scopes" from the menu. A "Code", a short identifier used to reference the scope in lists or data files, and the scope's "Name" are both required. The scope code must be unique within the project's list of scopes, must not contain spaces and will be automatically converted to uppercase. Scopes can be added at any time in the project lifecycle; however, a scope can only be deleted if there are no users and records assigned to it (i.e. if the scope is not considered "in use").
A user account can be assigned to a project more than once with different scopes. In this case, the project appears several times in the user's project list with the scope code in the "Access" column.
The scope of a user association cannot be changed. To associate a user with a different scope, delete the user association and re-create it with the new scope. Note that a user association cannot be deleted if it is the only user association with "Manage Project" access rights.
Besides scopes and access rights, a user can be selected as a recipient of notifications about changes in the dataset. Notifications are sent as e-mails when records are added or deleted.
Audit Trail
When enabled in the project settings, user actions are logged to create an accurate audit trail. Each log entry consists of an event code, date and time at which the event occurred, the name and the email address of the user performing the operation, an object identification (OID) as well as a textual description of the event. iPSN logs the following events (event codes are shown in bold):
- AUDIT LOGGING STARTED: Audit logging has been (re-)started.
- AUDIT LOGGING STOPPED: Audit logging has been stopped (via changes in the projects settings).
- AUDIT TRAIL DISPLAYED: The audit trail has been displayed.
- PROJECT CHANGED: The project settings have been changed.
- PROJECT CREATED: The project has been created (or imported).
- PROJECT EXPORTED: A snapshot of the project has been exported.
- RECORD CHANGED: A record has been changed.
- RECORD CREATED: A record has been added to the project's dataset.
- RECORD DELETED: A record has been deleted.
- RECORD DISPLAYED: A record has been displayed.
- SCOPE CHANGED: A scope has been changed.
- SCOPE CREATED: A scope has been added to the project's list of scopes.
- SCOPE DELETED: A scope has been deleted.
- USER ASSOCIATION CHANGED: A user association has been changed.
- USER ASSOCIATION CREATED: A user association has been added to the project's list of scopes.
- USER ASSOCIATION DELETED: A user association has been deleted.
Use the "Audit Trail" link from the menu to display the project's audit trail. The list of events is sorted by event date and time in descending order (i.e. newest entries first). To download the audit trail as a CSV file, click on the "Download" button in the bottom right corner of the list.
Since audit logging significantly slows down bulk operations, it should only be used if necessary, e.g. in projects with multiple users or in projects where traceability is required.
Exporting and (Re-)Importing the Project
Use the "Export Project" link to create a snapshot of the project. The project components to include in the snapshot (user associations, dataset, audit trail) can be selected in the export form. The created .ipsn-file is suitable for archiving and/or later re-import.
To import a project snapshot, click the "Import" button right above the list of projects. Select the .ipsn-file, choose the components to import and then click "Import". Note that if the imported project was part of a project hierarchy, this hierarchy will not be restored.
Deleting the Project
Select "Delete Project" from the menu to delete the project from the database. A project can only be deleted if it does not act as a parent project in a project hierarchy. In this case, the child projects (subprojects) must be deleted first.
User Account
To view or edit the settings of your user account, such as your personal information or your password, select "Account" from the dropdown menu in the upper right corner of the page. This menu contains links to your account data, to online help, and to log out.
Personal Data & Email
To change your personal data or your email address, select "Personal Data & Email" from the menu, then enter your changes in the input form and click "Save". Note that if you deselect "I want to receive notifications", you will no longer receive notifications for projects your account is associated with.
Changing Your Password
To change your password, select "Password" from the menu. Enter your current password, then enter the new password and retype it to confirm spelling. Click "Save" to save the new password or "Cancel" to leave your current password unchanged.
Event Log
iPSN records user-related events, such as login attempts or changes to the user account, in the user's event log. The following events are recorded:
- ACCOUNT DATA CHANGED: The personal information has been changed.
- FAILED LOG IN: A failed attempt to log in to your account.
- LOG OUT: A session has been closed (the user actively logged out).
- PASSWORD CHANGED: The password has been changed.
- PASSWORD RESET REQUESTED: A password reset (using password recovery) has been requested.
- PROJECT CREATED: A project has been created by this user.
- PROJECT DELETED: A project has been deleted by this user.
- SUCCESSFUL LOG IN: A successful log in to your account (using your email address and password).
Use the "Event Log" link from the menu to display the user's event log. The list of events is sorted by event date and time in descending order (i.e. newest entries first). To download the user's event log as a CSV file, click on the "Download" button in the lower right corner of the list.
API
iPSN provides an API (Application Programming Interface) to allow other software to access pseudonymization and depseudonymization functions. If your are a software developer and are interested in using this feature, please contact iPSN system administration to further discuss your project.